Jun 4th 2015
Rancilio User Guide
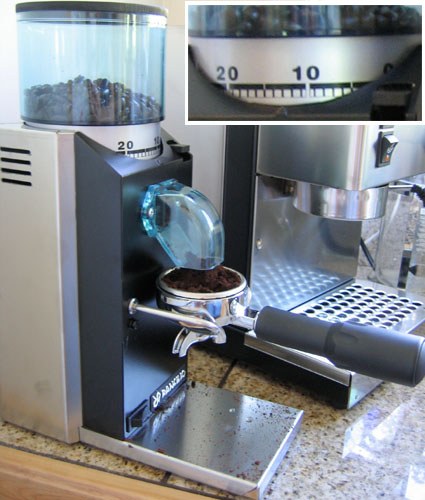
Silvia and Rocky Price $1040.00:1) The Silvia is well constructed, withbrass boiler, brass lines and chromed brass brewing head all which help to maintain temperature and heat distribution for the perfect espresso. One important point here; Get a good grinder! Your Silvia will be severely handicapped with a sub par grinder. Silvia is a compact machine at 13.25"H x 11.25"W x 9.25"D. 2) The Rocky (I recommend the doserless version) is an excellent product. With 55 settings - you should be able to dial in the right grind for espresso. The portafilter holder is nicely designed to hold the portafilter - hands free. Size: 4.5"W x 9.5"D x 13.75"H ISSUES:
Rancilio includes a plastic tamper with Ms. Silvia (tamper is used to compact the coffee grounds). This is probably responsible for more bad espresso shots and more frustration than anything else. Make life easy and get a decent
tamper.
Step by Step:If you follow the these steps you can get great results fairly quickly. Power up: Switch the power switch to on & wait 5-7 minutes for the 'ready indicator' to turn off. Then wait another 10 minutes to allow heat to spread through system - or use a spare mug and use the brew button to draw water through the group to quickly heat the system. This will cause the ready light to come back on - wait until it turns off before making the shot.
Grind to fill filter basket a little over filled. Use the double filter basket. Start with the grind. Your grind setting may be between 5 & 10 +/-. Variability in coffee beans determine fineness of grind. So -- the shot is fast and weak... try lower numerical setting for a finer grind. Conversely if you are using oily beans you might get a very slow shot and bitter thick espresso... try a higher setting.
Step 2.
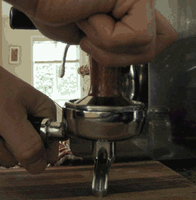
Level, Tamp and Load. Lift the tamped PF into the Silvia's Group Head and rotate from your left to right. The portafilter will turn past the 90 degree point. It should be tight but if it's a struggle you probably have too much coffee in the basket (dump it out and start with new grounds). If you cannot lift the PF into Silvia's Group Head you have too much coffee. If you try to make a shot like this you will likely have water leak over the basket rim.
Step 3.
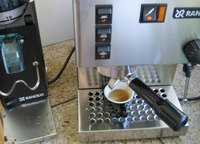
Making the shot.
Operation is pretty simple. At this point switch the top rocker indicated by a line art of a coffee cup - the round orange light will illuminate and the pump will engage pushing hot water through coffee grounds -- extracting the espresso. Within the first 5 +/-seconds you should be getting at least drips. If you don't get anything after 10 seconds you should switch the rocker to off (pressure will release in drip pan) and start over with a coarser grind. If you get a fast pale frothy shot you need to adjust for finer grind. A good shot will have auburn crema over black strong espresso or even pure crema. Extraction time for a double filter can be 20 or 35 seconds - maybe even longer. Watch the flow of espresso and if you see a blond color or bubbles in the flow you should stop the shot. Switch the espresso rockerswitch off to stop the extraction.
Step 4.
Steaming milk for a cappuccino. |